I tried this for several reasons: to share my iPhone data plan with my iPad, to see how difficult it was, and because I will likely want to swap SIMs between my dev iPhones, iPad, and my iPhone 4.
Also, soon I will be traveling internationally and plan to take only my iPad for computing. If trimming down a standard SIM is easy, I can plan to buy a prepaid SIM in each country. If micro SIMs are unavailable, I have a simple method for converting any standard SIM into an iPad/iPhone 4 compatible one.
Prerequisites: An iPad, a standard SIM from an iPhone or any other 3G GSM phone, a pair of sharp scissors, an x-acto knife, and a credit card (or unused SIM).
1. Create micro SIM adapter (skip a-d if using a spare SIM)
a. lay the iPhone SIM on top of the credit card.
b. using the tip of an x-acto knife or a fine marker, scratch the SIM outline onto the card.
c. cut out the new SIM adapter with scissors
d. Use a piece of sandpaper or the edge of the x-acto knife to scrape/sand the edges until the adapter fits into the iPhone SIM tray.
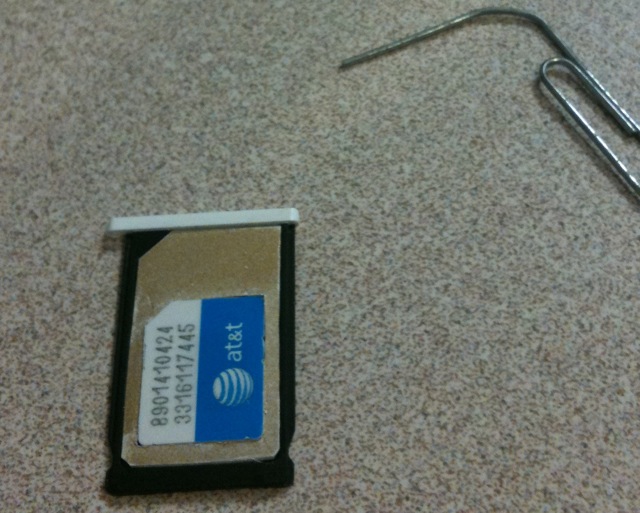
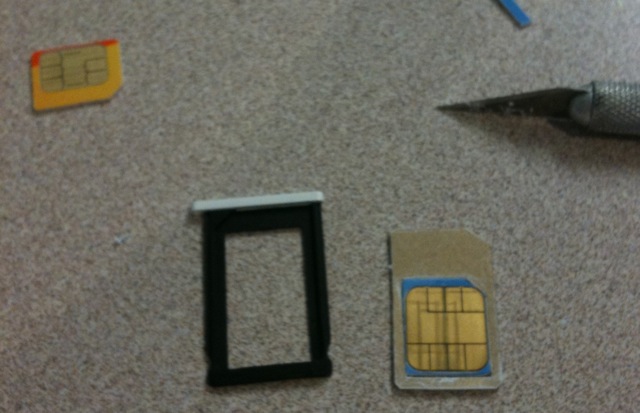
This next step is to position the micro SIM properly in the adapter. The micro SIM must be positioned so that the contacts of the micro SIM are aligned with the contacts of the SIM. I achieved this by flipping my SIM adapter and tray over, and aligning the contacts of the micro SIM in the tray slot. The net result is that my adapter has a border around 3 sides that is of identical size.
e. set the micro SIM on top of the adapter with the tabbed corners aligned
f. align the micro SIM so that it is centered horizontally and the bottom (non tabbed) border is the same width as the side borders.
g. mark the outline on the adapter with the x-acto
h. cut out with x-acto knife. Cut gently and accurately at first, and make subsequent passes to deepen the cut until you are through the material.
i. using the x-acto, scrape off adapter material until the micro SIM snaps into the slot
When you’re finished, is should look a lot like this:

2. Test micro SIM adapter
Insert the micro SIM into the adapter, the adapter into the tray, and the tray into the iPhone. I did so with my iPad micro SIM which was not activated. Upon doing so, my iPhone 3GS detected the SIM, showed AT&T as the carrier, the 3G icon lit up, and I received the following notice, “Could not activate cellular data network: You are not subscribed to a cellular data service.”
Voila, my adapter allows a micro SIM to work in my iPhone. Phase 1 was successful!
3. Cut SIM down to micro SIM size
I was a bit hesitant to hack up my SIM card. If I erred and destroyed my SIM, it would require a trip to the Apple or AT&T store for a new SIM, as well as an $18 activation fee. But I couldn’t help myself.
Since the adapter was already built, this step was actually very straight forward.
a. set the adapter on top of the iPhone SIM
b. mark the cutout with the x-acto knife
c. trim off the edges of the SIM with scissors.
d. shave the edge of the trimmed SIM until it fits into the adapter
Notice the alignment of the contacts in the photo. When the SIM and adapter are aligned, the contacts will not be cut. I repeat, the contacts will not be cut.
4. Test SIM in iPad and iPhone
a. stick the newly minted micro SIM into the adapter and the iPhone and verify functionality.
b. point your iPad (w/o SIM) web browser at www.unlockit.co.nz and install a custom IPN for your carrier
c. move the new micro SIM from the iPhone to the iPad
d. turn off the iPad wifi and test 3G connection
I called my iPhone number while the SIM was inserted into the iPad. I was hoping I’d get dumped into voice mail, but instead I get an AT&T error message stating that calling feature wasn’t available from my number. I suggest setting your iPhone call forwarding before and after using an iPhone SIM in an iPad.


You must be logged in to post a comment.